Back to Aquatint Box page Assembly of tray hardware
These boxes can be made from 3/4 inch plywood, but a better material for the main body of the box is 3/4 inch MDF (medium density fiberboard), since it's cheaper, not warped, full dimension and has no significant disadvantages as a construction material for these boxes. This model box uses metal tray fittings and hardware as opposed to the all-wood alternative. This box will accommodate an approximate maximum plate size of 16 x 20 inches (40 x 51 cm.). A box made to larger dimensions will work the same as one this size or smaller. The limitation would be that at some point increased size would make the box too physically large and unwieldly for the average operator to use. This box plan allows for an 1/8 inch gap between the edge of the tray and the wall of the box on all 4 sides to allow for airflow. I would assume that since a larger tray size would displace a larger volume of air during operation of the box, this gap would need to be increased proportionally.
| Box Assembly | Cut-list: End panels (2 each) - - - - 17 1/4 x24 in. Side panels (2 each)- - - - 22 3/4x24 in. Bottom (1 each) - - - - - - 17 1/4x21 1/4 in. Lids (2 each) - - - - - - - - 11 5/8 x19 1/4 in. Material: 3/4 in. Medium Density Fiberboard. Also needed: about 50 ea. 2-inch drywall screws, wood filler, carpenter's glue. |
End
panels overlap edge of bottom. Side panels overlap bottom and end panels. Bottom panel is lapped by side and end panels. Lids: To make the lids, cut them to the overall 11 5/8x19 1/4 in dimensions. When in position, the two lids will butt together forming a seam across the center of the box, through which the two 1/8 x 3/4 aluminum strips of the tray handle will pass. The two lids will also be slightly inset into the box, so that they will be held in position. This means each lid will have a "seam" edge (the two edges that will butt together across the middle of the box) and three outer edges, which will rest on the upper edge of the box. You need to cut a slightly larger than 1/8 x 3/8 in. kerf, 1 1/8 in. in from each end of the seam edge on both lids. When the lids are in place these will match up and provide a slot for the 1/8 x 3/4 in. aluminum handle-strips to pass through. Now cut a 1/4 in. by 1 in. rabbet in the 4 edges of each lid, forming a lip of 1/2 inch of lid to sit on top of the edge of the box and 1/4 inch of lid to fit down inside of the box to hold the lids in place. The lids will overhang the outside of the box by 1/4 inch. WARNING: be accurate, or the tray handles will stick and bind during operation of the box. To assemble panels, clamp pieces in position. Drill 1/8 in. diameter holes (or whatever size hole is appropriate for the screws you're using) about every 4 inches along the edge. Countersink and insert drywall screws. Fill cracks with wood filler or use glue. |
| Tray Assembly | Cut-list: Handle (1 each) - - - - - - 17 x 1 3/4 x 1 1/2 in. Material: standard 2x4. Tray (1 each) - - - - - - - 17 x 21 in. Material: 3/8 inch plywood. Hardware: Brackets (2 each) Material: 1/16 in. thick aluminum sheet. Handle strips (2 each) Material: 1/8x3/4 in. extruded aluminum strip. Other hardware: |
To
make the
handle, cut a piece of wood from the 2x4, 17 in.
long by 1 3/4 in. wide by 1 1/2 in. thick. Round the
corners
for comfort by sanding or with a router. With a router
cut a
3/4 in. dado across each end of the handle, centered along
the 1 3/4
in. axis, 1/8 in. deep. This is to recieve the end of
the 1/8
x 3/4 in. aluminum strip where it attaches to the end of the
handle
with two drywall screws. Make sure these two dado cuts
are parallel,
so that the two aluminum strips attaching the tray to the
handle will
be parallel. To make the tray, cut a piece of 3/8 inch plywood 17 inches by 21 inches. Brackets: from 1/16 in. thick aluminum sheet stock cut two trapezoidal shaped pieces each 6 in. high, by 5 in. across the bottom by 3/4 in. across the top. (see picture) Drill two 1/4 in. diameter holes aligned along the vertical center of the bracket one 3/8 in. below the top (3/4 in.) edge and one 1 5/8 in. below the top edge. Drill three 11/64 in. diameter holes along the 5 in. bottom edge, centered 3/8 in. back from the edge with one on center and the other two 2 in. either side of center. Make a 90 degree bend along the 5 in. edge, 1 in. back from the edge to form a 1 in. wide foot on the bracket. Handle strips: from 1/8 x 3/4 in. extruded aluminum stock, cut two pieces 24 3/8 in. long. Drill two holes in each end as follows: at the top (handle) end, 2 holes 13/64 in. diameter on center 3/8 in. and 1 1/4 in. from end. Countersink. At bottom (foot) end two holes 1/4 in. diameter on center 3/8 and 1 5/8 in. from end for wing-nuts to attach strip to foot bracket. These two 1/4 in. diameter holes have to align with the two 1/4 in. holes in the top of the bracket. When the brackets and strips are completed, position the top end of each strip in the dado cut at the ends of the handle and drill holes for inserting screws into the wood handle. Mark the center of each 21 in. long side of the bottom of the tray and place the bracket in position. (see picture) Clamp the bracket in place with the center hole in the bracket foot aligned with the mark showing the center of the tray edge. Drill three holes through the tray to insert the bolts to attach the bracket to the tray. Other hardware: (4 ea.) 1/4-20x1/2 slotted truss-head machine screws (4 ea.) 1/4-20 wing nuts, Type "A" (6 ea.) No. 8-32x1/2 slotted truss-head machine screws (6 ea.) No. 8-32 machine screw nuts (2 ea.) 3 1/2 in. metal chest handles with 5/8 in. screws |
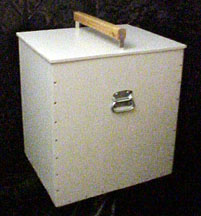 |
Handle and top of box with lids in place. |
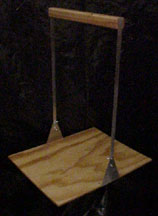 |
The tray and handle assembly. |
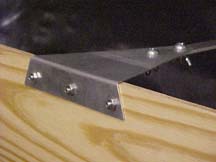 |
Bracket, showing bent foot. |
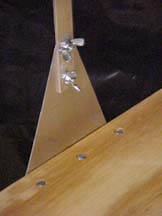 |
Bracket, tray and end of handle-strip, assembled. |